Temperature Monitor
Using mbed, DS1620, and ThingSpeak
This project uses a mbed microcontroller (LPC1768 ARM Cortex-M3) to monitor temperature using a DS1620 (digital temperature sensor IC), retrieve the time via NTP (network time protocol), and then log the current temperature to ThingSpeak (https://www.thingspeak.com/) along with a time-stamp.
To do this project, you’ll need:
· mbed microcontroller
· DS1620
· A 100 kilo-ohm resistor
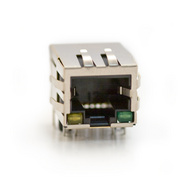
· RJ-45 Ethernet MagJack
Step 1: Setup a ThingSpeak channel
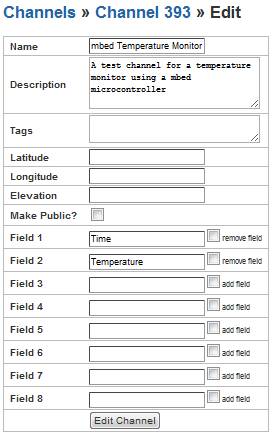
Sign up for an account on ThingSpeak and then create a channel with 2 fields. For example, mine:
So it became
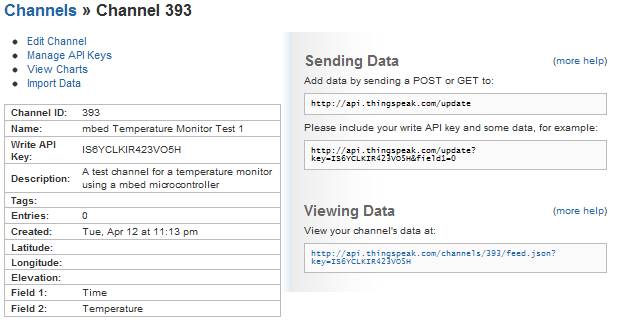
Remember the URL for sending data,
we’ll need this later where we write our source code to format the URL.
Step 2: Connect the mbed to the Internet
For background, you should read these pages:
· http://mbed.org/cookbook/Networking
· http://mbed.org/cookbook/Ethernet
· http://mbed.org/cookbook/Ethernet-RJ45
· http://mbed.org/cookbook/HTTP-Client
· http://mbed.org/cookbook/NTP-Client
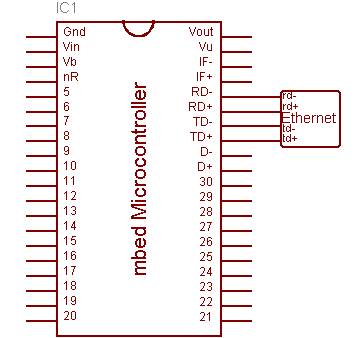
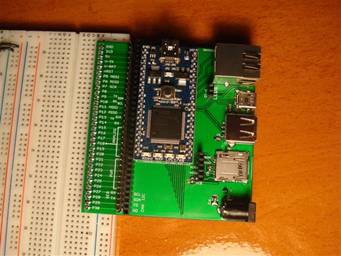
You’ll need a MagJack to connect an Ethernet cable to the mbed. First buy a MagJack (see http://mbed.org/cookbook/Ethernet-RJ45 for a list of places to buy them), then connect it to the mbed according to this diagram:
I am using one of these: http://mbed.org/users/frank26080115/notebook/my-mbed-base-station/
Although you can also use one of these: http://www.sparkfun.com/products/8790 and http://www.sparkfun.com/products/8534
Once you have all this setup, connect the mbed to a router via an Ethernet cable. You should run a few networking example programs to check your connection. The libraries we’ll be using will use all automatic configuration, and the libraries come with examples.
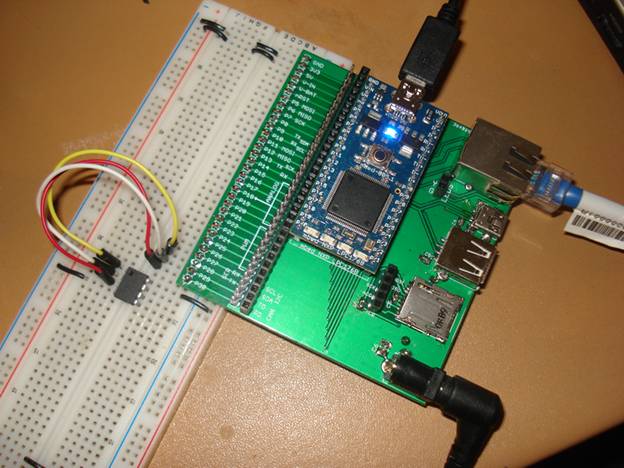
Step 3: Connect the DS1620
The DS1620 is a digital temperature sensor, it’s very simple to use. See more details and the datasheet here: http://www.maxim-ic.com/datasheet/index.mvp/id/2735
Well obviously you’ll need to connect the temperature sensor to the mbed. The temperature sensor uses 3 signals to communicate synchronously with the mbed (similar to SPI). You need to power the DS1620 with a voltage between 2.7V to 5.5V.
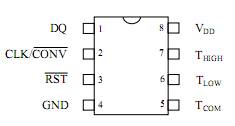
· Connect VDD to the 3.3V pin on the mbed (Vout)
· Connect GND to the ground pin on the mbed
· Connect DQ to pin 28 on the mbed, also use the 100 kilo-ohm resistor to pull this pin to VDD
· Connect CLK/!CONV to pin 29 on the mbed
· Connect !RST to pin 30 on the mbed
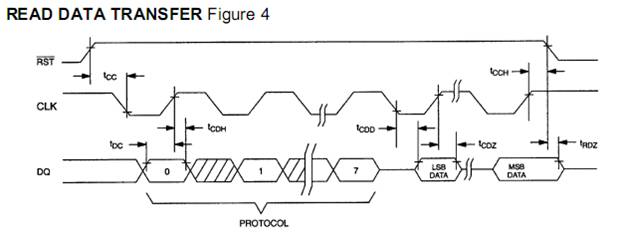
Please read through the datasheet completely. Please pay attention to the “write config”, “start conversion”, and “read temperature” commands.
Also take note of how the 3-wire communication will work. Take a look at the 3-wire communication between the mbed and the DS1620 sensor, here’s the screenshot from my logic analyzer:
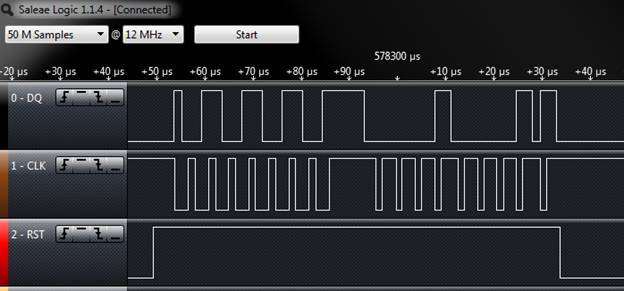
Sweet, compare it with the DS1620 datasheet:

Step 4: Writing the source code
First open up the mbed compiler and then create a new program.
Then you’ll need to import three libraries to use: HTTPClient, NTPClient, and EthernetNetIf
Then open up main.cpp and put in the main source code
|
#include
"mbed.h" #include
"EthernetNetIf.h" #include
"NTPClient.h" #include
"HTTPClient.h" // networking
stuff EthernetNetIf eth; NTPClient ntp; HTTPClient http; char* ntpServerUrl = "0.ca.pool.ntp.org"; char* thingSpeakUrl =
"http://api.thingspeak.com/update"; char* thingSpeakKey = "IS6YCLKIR423VO5H"; char urlBuffer[256]; char timeBuffer[64]; // pin defs DigitalOut rst(p30); DigitalOut clk(p29); DigitalInOut dq(p28); void
DS1620Send(long data, int numOfBits) { dq.output(); //
we are sending for (int i = 0; i < numOfBits; i++) { clk = 0; wait_us(0.05); if (data & (1 << i)) // bit is 1 { dq = 1; } else // bit is 0 { dq = 0; } wait_us(0.5); clk = 1; wait_us(0.5); } dq.input(); //
go back to being input clk = 1; //
leave high } float
DS1620ReadTemp() { rst = 1; DS1620Send(0xAA, 8); // read temp command dq.input(); int results =
0; // read in 9 bits for (int i = 0; i < 9; i++) { clk = 0; wait_us(0.5); clk = 1; wait_us(0.05); if (dq.read()
!= 0) // bit is 1 { if (i
< 8) { results |= 1 << i; } else { results *= -1; // last bit is
sign bit } } wait_us(0.4); } clk = 1; //
leave high rst = 0; return (float)results / 2; // div by 2
since last bit is 0.5 } void
DS1620Setup() { // initial pin states rst = 0; clk = 1; dq.input(); wait(0.1); rst = 1; DS1620Send(0x0A0C, 16); // config for continuous mode with CPU mode rst = 0; wait(0.1); rst = 1; DS1620Send(0xEE, 8); // start continuous
conversions rst = 0; wait(0.1); } int main() { printf("Start\r\n"); printf("Setting
up Ethernet...\r\n"); EthernetErr ethErr = eth.setup(); if(ethErr) { printf("Error
%d in ethernet setup.\r\n", ethErr); return -1; } printf("Ethernet
setup OK\r\n"); // get time from ntp time_t ctTime; Host server(IpAddr(),
123, ntpServerUrl); ntp.setTime(server); // start the sensor DS1620Setup(); while(1) { // update data here ctTime =
time(NULL); float temperature = DS1620ReadTemp(); // format time here timeBuffer[0]
= 0; strftime(timeBuffer, 64, "%Y-%m-%d %H:%M:%S", localtime(&ctTime)); // for debug printf("Time:
%s, Temperature: %f\r\n", timeBuffer,
temperature); // format url
here urlBuffer[0]
= 0; sprintf(urlBuffer, "%s?key=%s&field1=%s&field2=%f",
thingSpeakUrl, thingSpeakKey,
timeBuffer, temperature); printf("Request
to %s\r\n", urlBuffer); HTTPText resp; HTTPResult
res = http.get(urlBuffer,
&resp); if (res == HTTP_OK) { printf("Result
:\"%s\"\r\n", resp.gets()); } else { printf("Error
%d\r\n", res); } wait(16); // limited by ThingSpeak's API } return 0; } |
I will attempt to explain the source code in words: All this does is configure the sensor, connect to the Internet, and then run a loop which first retrieves the time using NTPClient, then retrieves the temperature from the sensor, and finally submits it to ThingSpeak via their API using HTTPClient.
The NTPClient provides an extremely simple way of retrieving the current time, this time is stored in a data structure, which will be formatted into a string for submission later. Note that ThingSpeak already timestamps your entries for you, but I wanted to play with NTPClient a bit so I’ve included it here.
The mbed communicates with the DS1620 using bit-banging (manually toggling pins) the 3-wire bus, LSB first, as per the datasheet http://www.maxim-ic.com/datasheet/index.mvp/id/2735. It is configured to operate in continuous measuring mode. Then in the loop, the mbed simple sends the read temperature command and reads the temperature.
HTTPClient is then used to submit data to the ThingSpeak API. All you need to do is send a GET request to the URL provided for your channel. The temperature and time are formatted into the two fields created for this channel.
Compile the program and copy the compiled .bin file into your mbed. If everything is connected, you can power up the mbed and let it run.
Step 5: The results
If you have a mbed, you’ve probably already setup the serial port for debugging already, if not, follow these links:
· http://mbed.org/handbook/SerialPC
· http://mbed.org/handbook/Windows-serial-configuration
· http://mbed.org/handbook/Terminals
Open up a serial terminal and connect to the mbed at 9600 baud. My code outputs debug messages, it looks something like this:
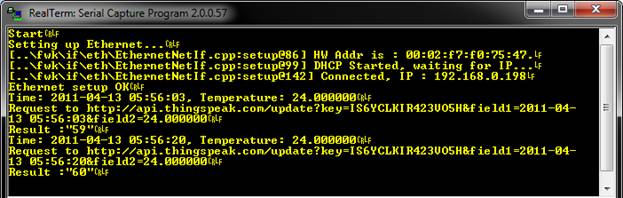
Everything looks great!
Now go to ThingSpeak and check
your data, but first, check the API documentation: http://community.thingspeak.com/documentation/api/
Remember to use a read-only API key or make the channel public, or
else you can’t see your data.
It looks like we can use an URL like http://api.thingspeak.com/channels/(channel_id)/charts/(field_id)
to visualize our data:
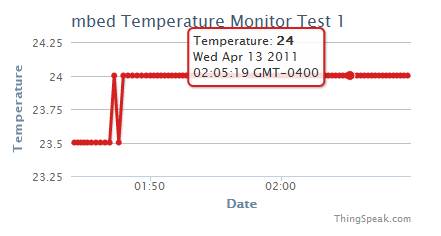
I used the API
documentation to embed the chart into a webpage, which is how I got that
screenshot, it looks sweet!
Here it is live!
Step 6: Finishing up
I connected a DC power supply to my mbed so I can run the mbed without keeping my computer on all the time. I suggest you do the same.
Now you can leave this device in a green house, outside, inside, and monitor the temperature from anywhere in the world!
If you have another sensor to add, simply add a bit of code to read that sensor, add another field to your ThingSpeak channel, and reformat the URL in the code slightly!